ShinyMinor
Would you like to react to this message? Create an account in a few clicks or log in to continue.

ShinyMinor

Mainly Stick Men
 
HomeLatest imagesSearchRegisterLog in


 Pixel Boxes (Never Ending Imagination)

Go down 
AuthorMessage
shadowpig60
Admin


Posts : 22
Join date : 2009-01-28

Pixel Boxes (Never Ending Imagination) Empty
PostSubject: Pixel Boxes (Never Ending Imagination)   Pixel Boxes (Never Ending Imagination) I_icon_minitimeSat Jan 31, 2009 2:10 pm

If you don't have MS Paint download it here
http://download.microsoft.com/download/winntwks40/paint/1/nt4/en-us/paintnt.exe
1 Open up paint
Pixel Boxes (Never Ending Imagination) 1
2 The one tool you will mainly need, the pencil tool
Pixel Boxes (Never Ending Imagination) 2
3 Make a new Board/Drawing Pad
Pixel Boxes (Never Ending Imagination) 3
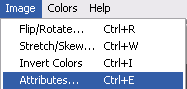
4 Go to Attributes and make the Board/Drawing Pad about 200x200
Pixel Boxes (Never Ending Imagination) 4
5 Zoom in with the magnet 8 times
Pixel Boxes (Never Ending Imagination) 5
6 With the pencil tool draw 10x2 like this
Pixel Boxes (Never Ending Imagination) 6
7 Use the select tool and go over what you just drew
Pixel Boxes (Never Ending Imagination) 7
8 Right click and copy
Pixel Boxes (Never Ending Imagination) 8
9 Right click and paste
Pixel Boxes (Never Ending Imagination) 9
10 Go to image and Flip/Rotate
Pixel Boxes (Never Ending Imagination) 10
11 Chose Horizontal and click ok
Pixel Boxes (Never Ending Imagination) 11
12 It should flip and slide it down so the first two over lap
Pixel Boxes (Never Ending Imagination) 12
13 Draw 19 straight up, put it right on top of the last one like so
Pixel Boxes (Never Ending Imagination) 13
14 Repeat 7-11 and put it on the last side like the other one
Pixel Boxes (Never Ending Imagination) 14
15 Copy the bottom
Pixel Boxes (Never Ending Imagination) 15
16 Paste and slide down so it fits between them
Pixel Boxes (Never Ending Imagination) 16
17 Draw a straight line down the middle (I know its not even) Go with the right side
Pixel Boxes (Never Ending Imagination) 17
18 Copy the bottom again
Pixel Boxes (Never Ending Imagination) 18
19 Repeat 7-11 with it but flip it vertical
Pixel Boxes (Never Ending Imagination) 19
20 Slide it down till the ends over lap
Pixel Boxes (Never Ending Imagination) 20
21 I see the line select the pencil tool and just hold right click over it and it should erase
Pixel Boxes (Never Ending Imagination) 21
22 There is a color palette at the bottom like this if u haven't rearranged stuff
Pixel Boxes (Never Ending Imagination) 22
23 Double click it and click Define Custom Colors
Pixel Boxes (Never Ending Imagination) 23
24 This should pop up to the right chose a color
Pixel Boxes (Never Ending Imagination) 24
25 Go pretty light with it and click Add To Custom Colors then click Ok
Pixel Boxes (Never Ending Imagination) 25
26 Color the inside lines with the custom color you just selected
Pixel Boxes (Never Ending Imagination) 26
27 Select the paint bucket
Pixel Boxes (Never Ending Imagination) 27
28 Repeat steps 22-25 but this time go a little darker and fill in the top space with it
Pixel Boxes (Never Ending Imagination) 28
29 Repeat steps 22-25 to more times and go darker but go left then the right and fill them
Pixel Boxes (Never Ending Imagination) 29
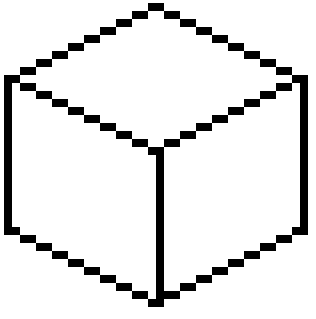
30 Zoom out and look at your outcome, but its not done yet
Pixel Boxes (Never Ending Imagination) 30
31 Zoom in to about 2 times
Pixel Boxes (Never Ending Imagination) 31
32 Copy and paste and move to just the side like this
Pixel Boxes (Never Ending Imagination) 32
33 And with this simple box you can get a lot of things I made this
Pixel Boxes (Never Ending Imagination) 33

And that is all my tutorial
---------------
Shadowpig60
Back to top Go down
https://shinyminor.board-directory.net
 
Pixel Boxes (Never Ending Imagination)
Back to top 
Page 1 of 1

Permissions in this forum:You cannot reply to topics in this forum
ShinyMinor :: Tutorials :: MS Paint Tutorials-
Jump to: